Posted by Matty on December 22, 2017, 10:45:57, in reply to "Re: TEST "
Hey, David! Sorry for the delay - still facing several challenges here.
I'm converting the ancient RevellOgram Buckley kit into a present for a 93yr-old vet of that ship who lives closeby down here - 'fact, I'm just about to head out and visit with him again right now! I already had a boneyard example of that Lindberg kit which is, at least nominally a Rudderow - but didn't know what I have since learned even from this build so far:
A) the Rudderow- and Buckley classes were quite similar in most if not all important aspects; and
2) the APD conversion is deceptively far more extensive - the whole new center section wiping out 90% of the differences between the Rudderows and Buckleys - than ever expected to begin with!
The only "beef" I would still have with the Lindberg kit - as always - is that the hull is just lousy. The venerable Revell Buckley's is far better. Likewise, there is also a Buckely-class mold by Trumpeter - ironically, known for their "Trumpy Lousy" hulls - but which in this case is actually very good: their USS England - also, in 1:350 closer to the scale of that Lindberg (USS Riley, USS DeLong etc.).
I also have long in-progress (i.e.: stalled on the Shelf of Doom ) another project: to mass-produce a decent DE hull to replace Lindberg's little 530-ish scale version of that same mold. Then, as an APD it could go right alongside a Revell Missouri and not too far from the Renwal North Carolina and (backdated/converted) Pasadena - or also the Revell North Carolina and even Aurora Saint Paul - hitting the beach...
David, if you can wait a bit for them to be posted then you could at your leisure send me pics of your Rudderow conversion and I'd be happy to make a new thread to include them, buddy! Just eMail 'em* to me.
Cheers,
- Matty *Don't forget: please keep each eMail down to 5mb max!
haven't taken any pictures yet as have been working on my 2nd biggest model yet, my house. made a new heavy duty screen front door from a wood kit door that I modified so that I can use the 2 glass panels from the original storm door for the storm window of this room which is my office. re-did 2 sets of windows both upper & lower sashes to improve the air tightness tho can't completely finish them til next spring. getting close to finish the bulges on the Revell 1/429 scale Arizona, will take some pictures soon. merry Christmas & happy new year if we don't talk before then.
I was up on the roof myself the other week (a terrifying experience, as always) to do the last of the hurricane repairs: pulling out, laying down replacements and pounding in about a dozen shingles that Hurricane Irma had either ripped in half or tore off completely. And of course I left it for this time of year - the only (roughly 3) months the roof isn't hot as a Friggin' Furnace - and/or wet and dangerous, after the overnight rains or pre-dawn dewfall, before the sun gets too high. You just can't win. Plus, of course, when it gets warm and raining again comes all the never-ending Yard Work - Oiy!
So I guess the following that I can show you, has been something of a Minor Miracle:
Massive progress over the last several weeks, on Sims APD-50 from the RevellOgram Buckley. And as you can see, virtually every square inch of the superstructure and main deck had to be monkeyed-with - most of it, majorly - indeed even the gray plastic all over the bridge so extensively modified it would've been no more difficult to scratch it into a Rudderow-type APD. About the only things still basically OOB are the funnel and hull itself.
And even the funnel, above, being from the ancient Revell mold of course needs detailing. Indeed, I have to upgrade virtually all the OOB detail parts, especially the guns: replacing them wholesale - plus of course all the APD-specific landing craft and their davitts, etc. (not all shown):
These masters have already been molded and cast, though - so actually The Light at the End of the Tunnel is in sight for all these, too. Finally, also thrown in above: the depth charge track is a tiny taste of the numerous PE improvements likewise already lined up to go on.
So, despite endless delays it's been quite a satisfying build - and I'm excited that it will end up being (which I always try to do) one of my best-ever.
Would love to see your Arizona progress when ready, David. (I had always thought the blisters were one thing which that Revell mold had gotten right.) Happy Holidays to you too (and everyone), buddy!
The pair of small tooth-like triangular plates on each side are (what I would call) "Footer Plates" for the Boat/Landing Craft Launching Rails: anchoring them to the hull-sides in addition to the deck. The trio of taller plates each side I would call "Bulwark Plating" for the extensive Boat Cradle rigs: each side having three uprights taller than an LCVP and supporting a second-tier set of Cradles to stack a second LCVP right over top. Again, these plates would greatly increase the structural support - tied directly into the hull sides - while also I have no doubt providing just that much more sea/weather protection for the stowed boats.
Your drawing may not sufficiently) indicate the tiny Launching Rail Footer Plates, but evidently don't show at all the tall Boat Cradle Bulwarks: however the historic pics - indeed, on most of the Buckley-derived APDs - certainly do. Including the pic of Sims in my original post. Surf NavSource and you will see them all.
On a modelling note, since all the above plates rise flush from the hull-sides, I thought to save myself some glueing and sanding by just incorporating them into the plating extensions to begin with. Wrong: from the get-go they proved far more hassle than any possible benefit. And - after all that - they may yet have to come off, anyway: turns out constructing both the pair of Launching Rails/Gantries and Boat Cradles (complete with finished LCVPs inside) as separate sub-assemblies before attaching them to the deck is beginning to look like by far the more reliable and easier approach - both for construction and painting!
By rights, I should've done some work on precisely this, today - but instead looks like all I'm gonna be able to squeeze in is this bit of yakking, on-line - Merry Christmas, everybody!
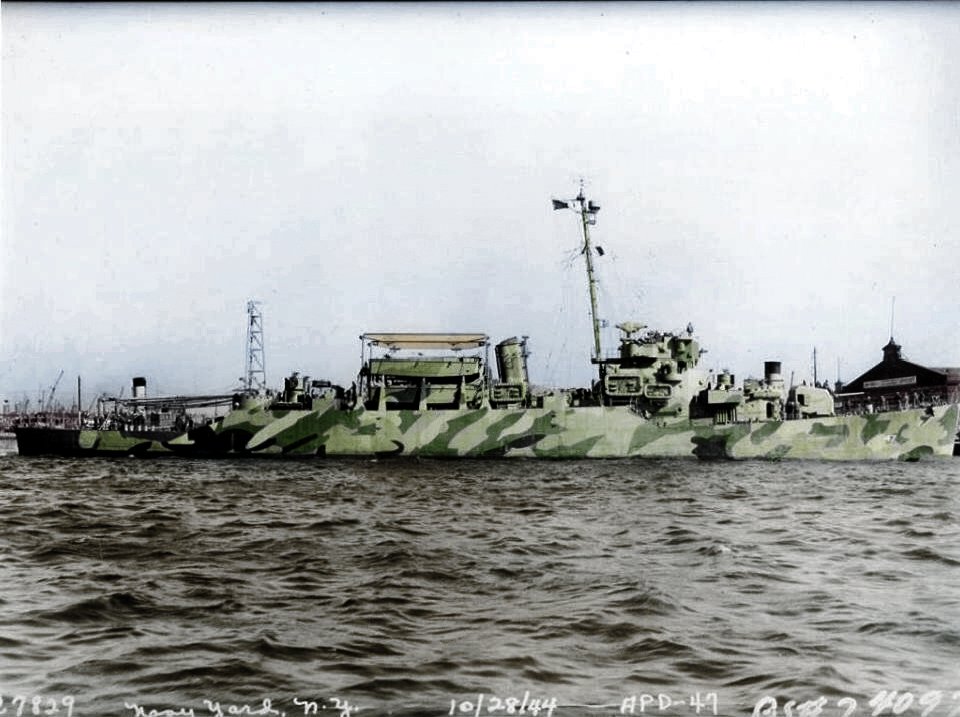
some of the apd's have 3 of those bulwark plating, some have 2 & others have none. here is the starboard view USS Bates (APD-47) so you can correct the shape of your bulwark platings. http://www.navsource.org/archives/10/04/100404701.jpg
I can see it...
Posted by Don Murphy on December 16, 2017, 0:44:07, in reply to "TEST "
Getting ready to apply a Matty Models bow to USS Yorktown.
Cheers,
Don
WWII Short-Hulled ESSEX Construction Tips
Posted by Matty on December 16, 2017, 13:14:45, in reply to "I can see it..."
Good On-Ya, Don!
I couldn't readily lay hands on my latest draft of the Construction-Tips Page for this set, but here's some already-uploaded pics (with some notes/recollections) intended for it:
Make your first mark/cut following the Lindberg waterline back from the bow - but don't trust (anything about) the panel lines from there on: rely instead on your Mk1 EyeBall to pinpoint the location shown in these pics and to ensure your cuts are square and vertical, for the best/easiest execution.
You should have practically no need even for putty (much less any "shimming") whatsoever - however you will need to decide how to deal with the rest of the Lindberg anchor deck: which isn't level, nor even flat. (!)
In any case, your result is going to look one helluva lot more like a WWII Short-Bow Essex (including your Yorkie plus Lexington, Franklin, Wasp, Hornet, Intrepid, Bunker Hill, Bennington, BonHommeRichard and of course Essex herself) when you're done.
Good Luck, Donny and (anybody) don't hesitate to ask any questions about any of the above!


